Ceiling Repair – When to Call in the Experts
The ceiling is often overlooked but contributes significantly to a home’s aesthetics and structural integrity. Regular inspections can identify early signs of cracks, stains, and plaster damage.
Hairline cracks can be fixed with joint compound or drywall mud, but more significant ones may indicate underlying problems. Water stains require prompt attention to resolve the leaks, and mold growth requires appropriate ventilation and thorough cleanup. Contact Ceiling Repairs Perth now!
While cracks in walls can be minor cosmetic problems easily fixed with spackle and a fresh coat of paint, ceiling cracks can indicate a much more serious problem. Understanding the different types of cracks and their possible causes and knowing when to call in the professionals can help you keep your home safe, comfortable, and sound for years to come.
One of the most common causes of cracks in a ceiling is settling. All homes settle naturally, and as they do, building materials in the structure will expand and contract. These rapid changes can cause the plaster and drywall to crack. If the cracks are accompanied by water damage, a professional should be called to assess and address the issue.
Another common cause of ceiling cracks is sagging. This usually happens because of a buildup of moisture in the space above the ceiling. Sagging can lead to a variety of issues, including a loss of structural integrity and the development of mold and other dangerous substances. If left unattended, a sagging ceiling can collapse completely.
In general, a crack in the ceiling should be addressed as soon as it is noticed. This will help prevent the underlying problems from getting worse and may even allow you to claim any damages caused by the cracking on your homeowners insurance policy.
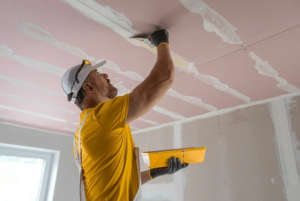
Before beginning any repairs to your ceiling, it is important to cover up anything in the room that you do not want covered in dust or paint. It is also a good idea to lay down a tarp or piece of plastic in the area where you will be working to catch any falling debris. Finally, set up a ladder that is tall enough to comfortably reach the area you will be working on.
To begin, score the crack with a utility knife and then use mesh tape to cover it. This will help the mud to bond with the surface of the ceiling, making the repair stronger. Next, apply a thin coat of joint compound to the cracked area with a small trowel. After the first 2 coats have dried, use a longer trowel to smooth out the surface of the mud and make it easier to match the rest of your ceiling. Let this dry overnight and then apply a primer and two topcoats of paint.
Water Stains
Water stains in your ceiling aren’t just unsightly; they’re often a warning sign that something else is going on in your home. Left unchecked, they can spread, ruining personal belongings and compromising the structural integrity of your home. Water stains are also an indication that your home’s plumbing system is not functioning properly.
While it may be tempting to simply cover up water stains with paint, this is a mistake. The stain will most likely reappear shortly after you’ve painted over it. Instead, identify the source of the stain and repair it to prevent future stains from occurring.
Water stains are typically caused by leaks in the roof. These can be caused by missing or loose shingles, which allow rainwater and snow to seep through the gap, or from damaged or corroded gutters. Water stains can also occur when pipes running through the ceiling are leaking. If you suspect you have a water leak, it’s important to contact a professional immediately to avoid further damage and costly repairs.
If you have a water stain in your ceiling, first protect the surrounding area with drop cloths. Next, use a damp cloth or sponge to gently clean the stain. Avoid vigorous scrubbing, which can further damage the ceiling material. Once the stain is cleaned, apply a stain blocking primer to the entire ceiling surface. Make sure you select a product that’s specifically designed for use on water stains.
Before painting over the stain, make sure it’s completely dry. It’s also a good idea to replace any ceiling tiles that have been impacted by the stain. Finally, choose a color that matches the existing ceiling to ensure a seamless look.
If you regularly inspect your home for cracks and other issues, you can prevent many common problems from occurring in the first place. By taking the time to regularly perform basic maintenance, you can ensure your property remains in top condition and keep it safe for you and your family.
Textured Ceilings
Increasing in popularity, textured ceilings can enhance the appearance of any room in your home. They provide a wide variety of design options and can conceal imperfections in your walls and ceilings. However, it is important to consider which rooms are suited to a textured finish, as they can be harder to clean and repair than smooth finishes.
Textured ceilings are available in many different styles, and some may be more suitable for certain rooms than others. For example, wood ceiling texture types are great for rooms such as dining areas or sunrooms that will be used for entertaining or relaxing. They create a rustic, cabin-like ambiance and can be left unpainted or painted for added visual dimension.
Other textured ceiling options include stomp and knockdown textures. Knockdown textures, which involve spraying joint compound and lightly “knocking” it down with a trowel, offer more versatility in design and are easier to clean than popcorn textured ceilings. It is a popular choice for modern homes and is a good alternative to drywall.
Popcorn ceiling texture, which involves sprinkling wet joint compound with a hand-held sprayer, offers visual interest in your rooms and can be very appealing when applied well. However, it is not as easy to clean and can be difficult to repair, as touch-ups can be difficult to blend in due to the stippled surface. In addition, it is more prone to damage than other textures and is considered dated by some homeowners who prefer smooth ceilings.
If you have a popcorn ceiling that is leaking or showing signs of water damage, it’s important to take steps to address the issue right away. If the discoloration is not too severe, you can apply an aerosol sealer to the affected area that effectively conceals water stains, smoke stains, and oil. After applying the sealer, you should wait 24 hours and then re-paint the damaged section of the ceiling.
When repairing a textured ceiling, it’s important to protect yourself by covering the floor with drop cloths or plastic sheets and placing tape along the wall edges where it meets the ceiling. You should also wear protective glasses and a respirator. After spreading your patch repair mixture, use a trowel to mimic the existing ceiling texture, varying the pattern and angle of the trowel for a seamless repair. Once the repair has dried, sand the edge with fine-grit sandpaper to blend it in with the rest of the ceiling.
Poor Installation
When you see a crack, sag, or other damage in your ceiling, it’s important to evaluate the problem carefully before attempting to repair it yourself. The process can be tricky, and it’s often best to leave it to professionals to ensure that the job is done properly. Getting structural issues fixed quickly is also vital to avoid further damage.
While many homeowners can handle minor ceiling repairs, a professional contractor is better equipped to deal with serious problems like water leaks and structural concerns. They’ll be able to determine what caused the damage in the first place and implement appropriate repairs before the problem gets worse.
Before you start on a ceiling repair project, be sure to set up adequate lighting and secure your ladder so that you can work safely. It’s also a good idea to bring a partner with you when working on the ceiling so that you can keep an eye out for hazards, especially in areas where a ladder might need to be positioned at awkward angles. You should also cover any furniture and floor surfaces that could get wet in the event of a drip or a leaking ceiling.
A basic drywall repair involves removing any loose debris, patching cracks, and smoothing the surface. It’s a good idea to use a moisture meter to confirm that the area is dry before proceeding with any further work. You can also choose to add a textured coating to the repaired area after the drywall is cured, but this step requires some practice before you can achieve an even texture that matches the rest of the ceiling.
If you have plaster ceilings in your home, it’s a good idea to get them inspected regularly for signs of damage. If you notice that your ceilings are starting to sag or develop cracks, this is a sign that they’re losing their structural integrity and need reinforcement or replacement.
A sagging ceiling can also cause problems with airflow, which can increase your utility bills by forcing you to heat or cool extra space that doesn’t need to be heated or cooled. A South Shore ceiling repair and installation service can help you correct this problem by repairing cracks or adding new plaster to a sagging ceiling.